Overview
You may use client details view to manage info about commercial contacts, location, work areas, billing, schedule, notes, net terms, client sales tax and activity.
Commercial Clients List
Within the commercial clients list you may create new, modify existing, disable previous clients, export client list or commercial locations list to a csv file. To add a new commercial client go to Clients > Commercial Clients > Create New.
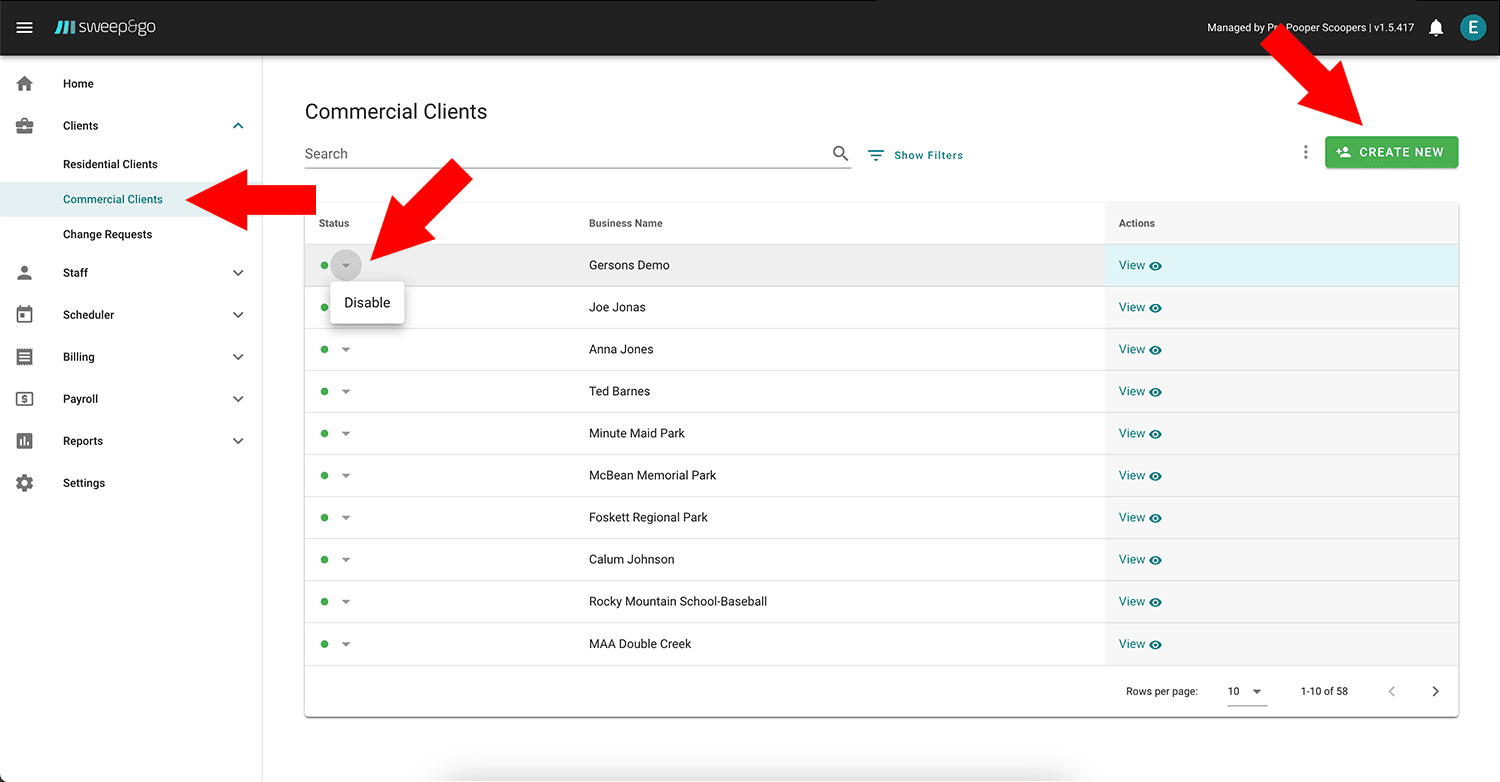
Create, modify or disable commercial clients
To disable a previous client, click the down arrow next to his status and choose disable. If you need to re-activate a client, turn on disabled clients filter and click on the arrow next to the status and then Activate.
To export client list or locations list to a csv file click on three dots in the upper right corner then choose one of these two actions.
Create New Commercial Client
To create a new commercial client you need to enter general info, billing info, service location and service info.
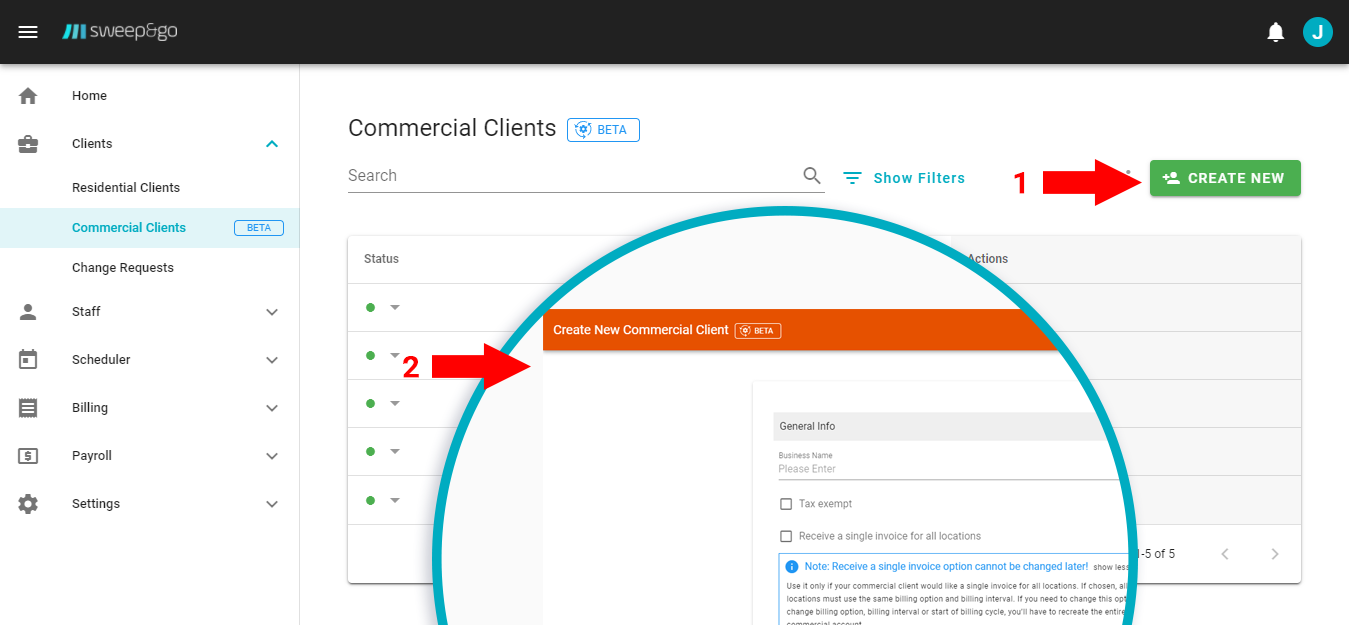
Create new commercial client
Within the general info you may choose if a client will receive separate invoices for each location or a single invoice for all locations. If you choose a single invoice for all locations, all client locations must use the same billing option and billing interval. If you need to change this option or change the billing option, billing interval or start of the billing cycle, you’ll have to recreate the entire commercial account.
Within the billing contact section you need to enter billing info which will be displayed on the invoice. This information includes contact name, company name, contact’s role and billing address. Here you may also select if the contact will be receiving job notifications, invoices via email and if you would like field techs to see contact information within the field tech app.
If you do not know the commercial billing contact first and last name, you may use Billing Department.
Under the service address section you need to enter the location address where the service will be provided. For service info it is necessary to enter service name, frequency, billing option, billing interval, price and start of the billing cycle. If an initial cleanup is not required you may uncheck that option. After adding a new client you will need to assign the client location (See Unassigned Locations tutorial) unless the app reuses the previous location assignment.
Update Commercial Client Details
To update client info or create multiple client locations please open the client details view.
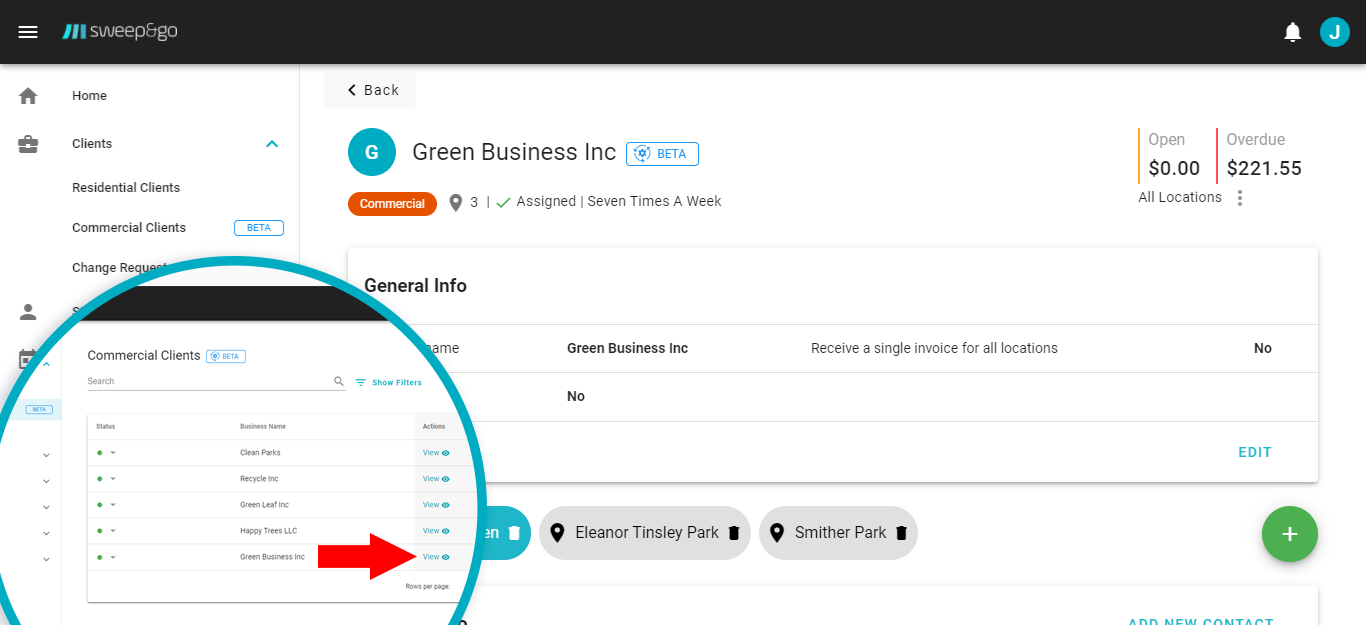
Update client details
General Info
Within the general info section you may update the business name or choose if a client is tax exempt.
Client account balance is shown on the top of the client details page. Account balance may be displayed per single location or for all locations.
To add additional commercial locations click on + on the right. Enter location info, service address and service info. If billing information is different from the main location click on the down arrow to enter billing info. For locations with a single invoice, billing contact needs to be the same. If you need to update location name click on three dots next to location name > Edit Location Name > Save.
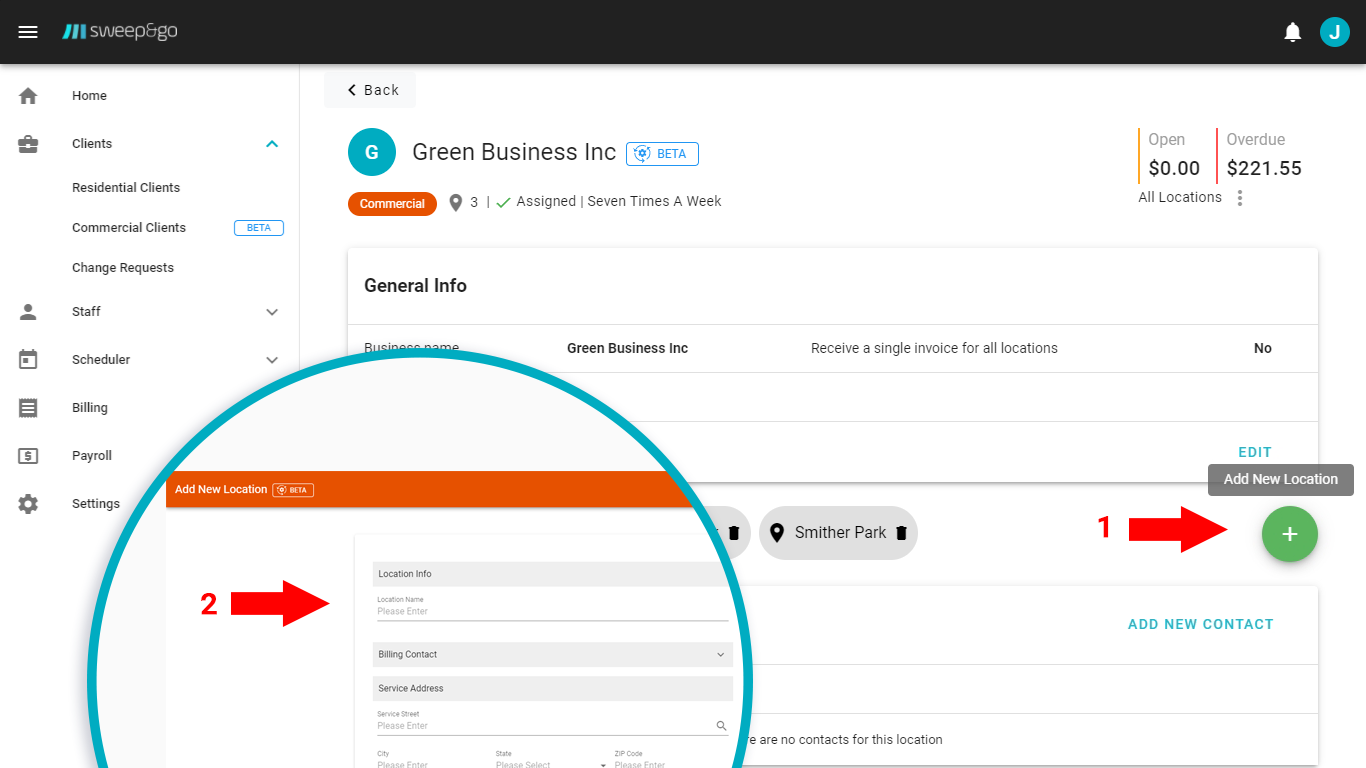
Add new commercial account location
Contact Info
Within the contact info section you may enter multiple contacts for each location by choosing Add New Contact.
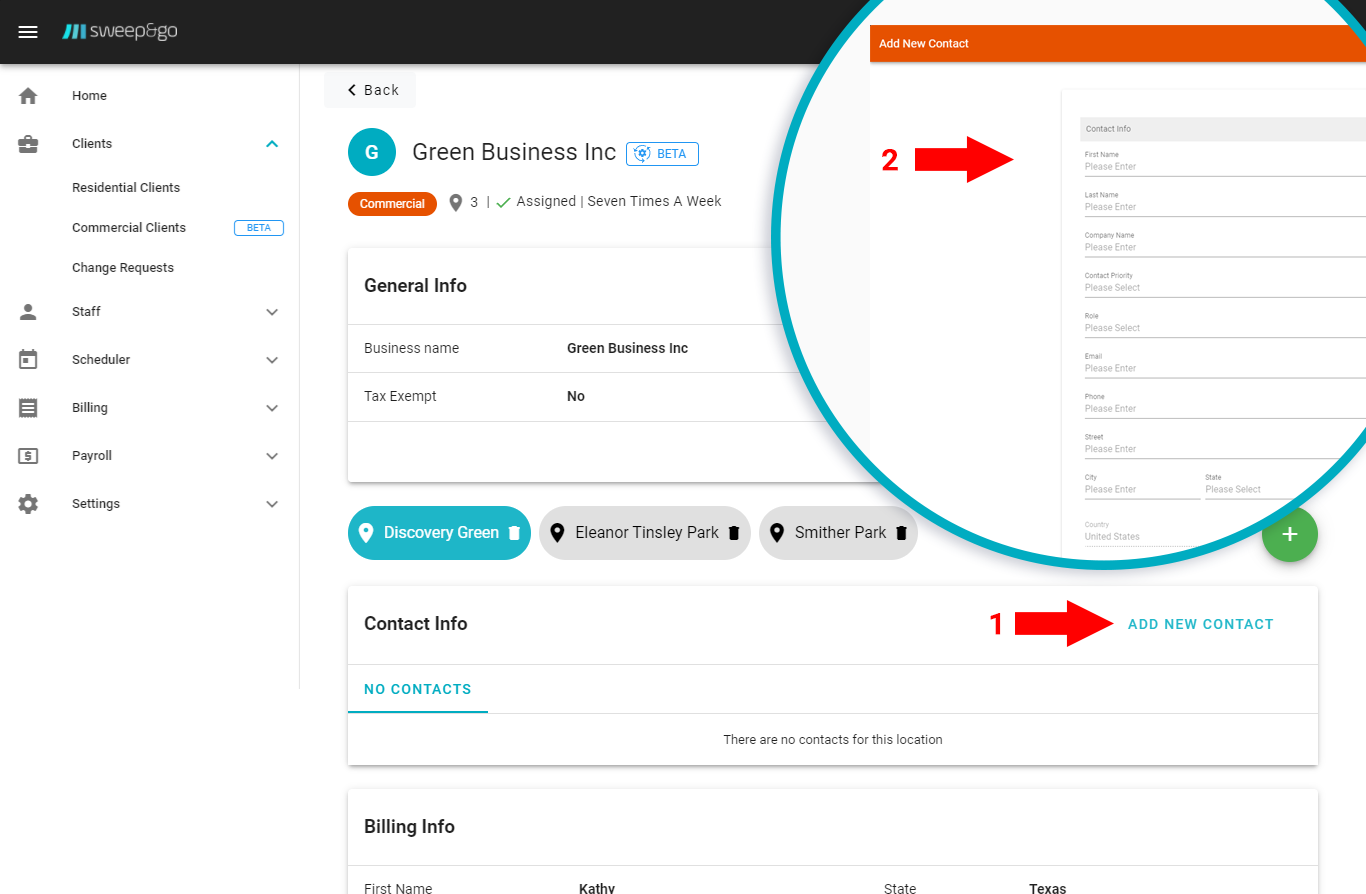
Add new contact
Service Address
You may update the client service address within the Service Address section > Edit. Change of commercial location address will not affect the existing subscription.
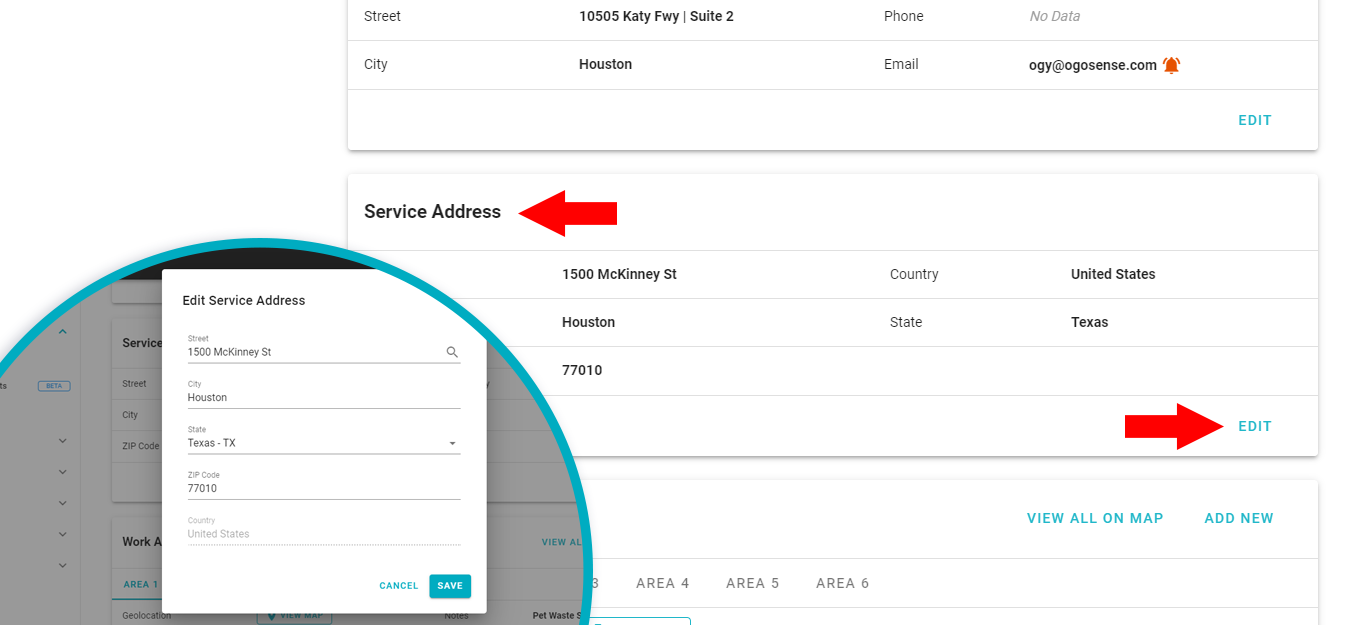
Update service address
Work Areas
For each commercial location you may create as many work areas as you need. To add a work area go to the Work Areas section > Add New.
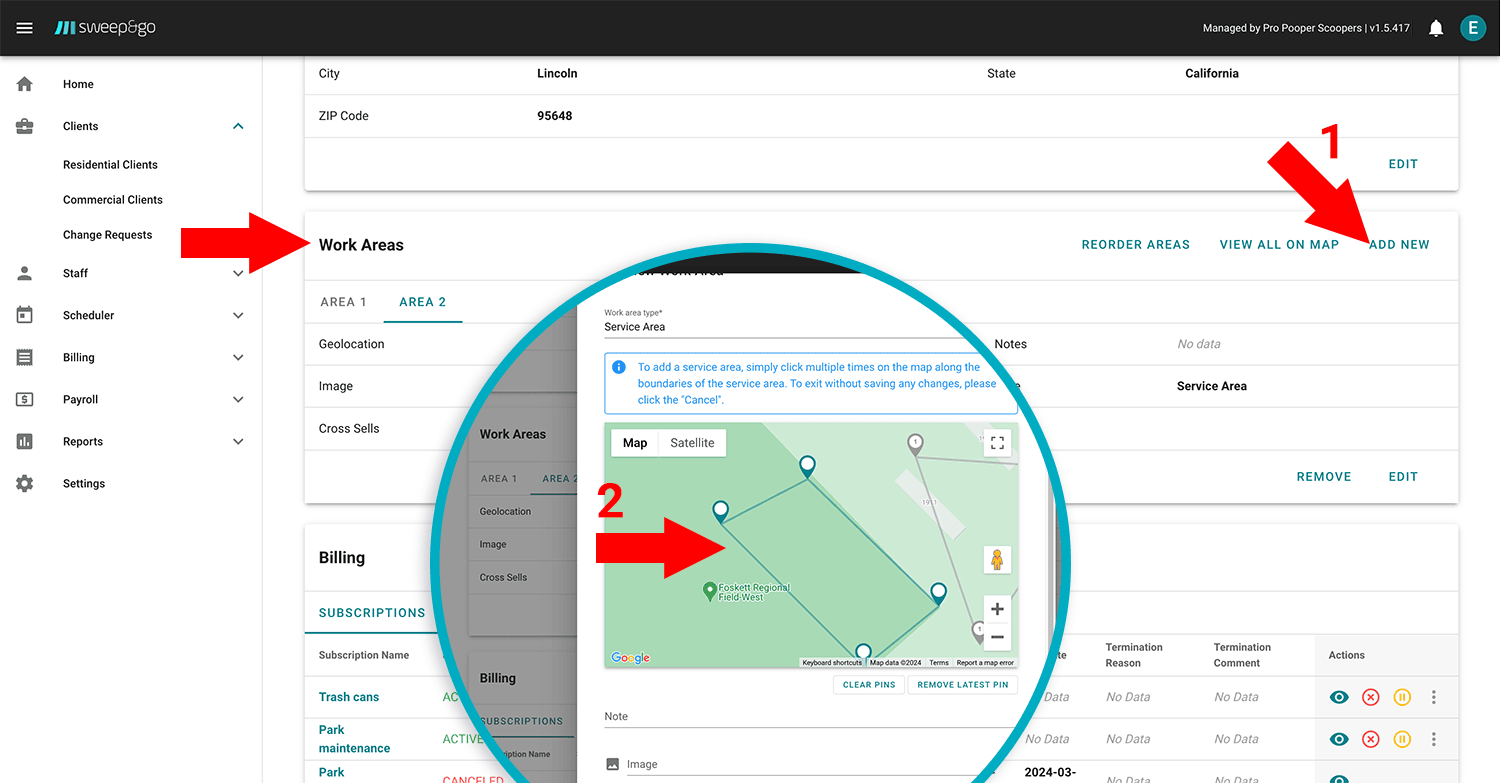
Add work areas
To add a pet waste station, click the map once. To add an area, click multiple times along the area edges. To exit, click cancel. You may also add a note about the work area, insert an image, add work area longitude and latitude, add a pet station model or assign a cross-sell.
To view all work areas on the map click on View All On Map button.
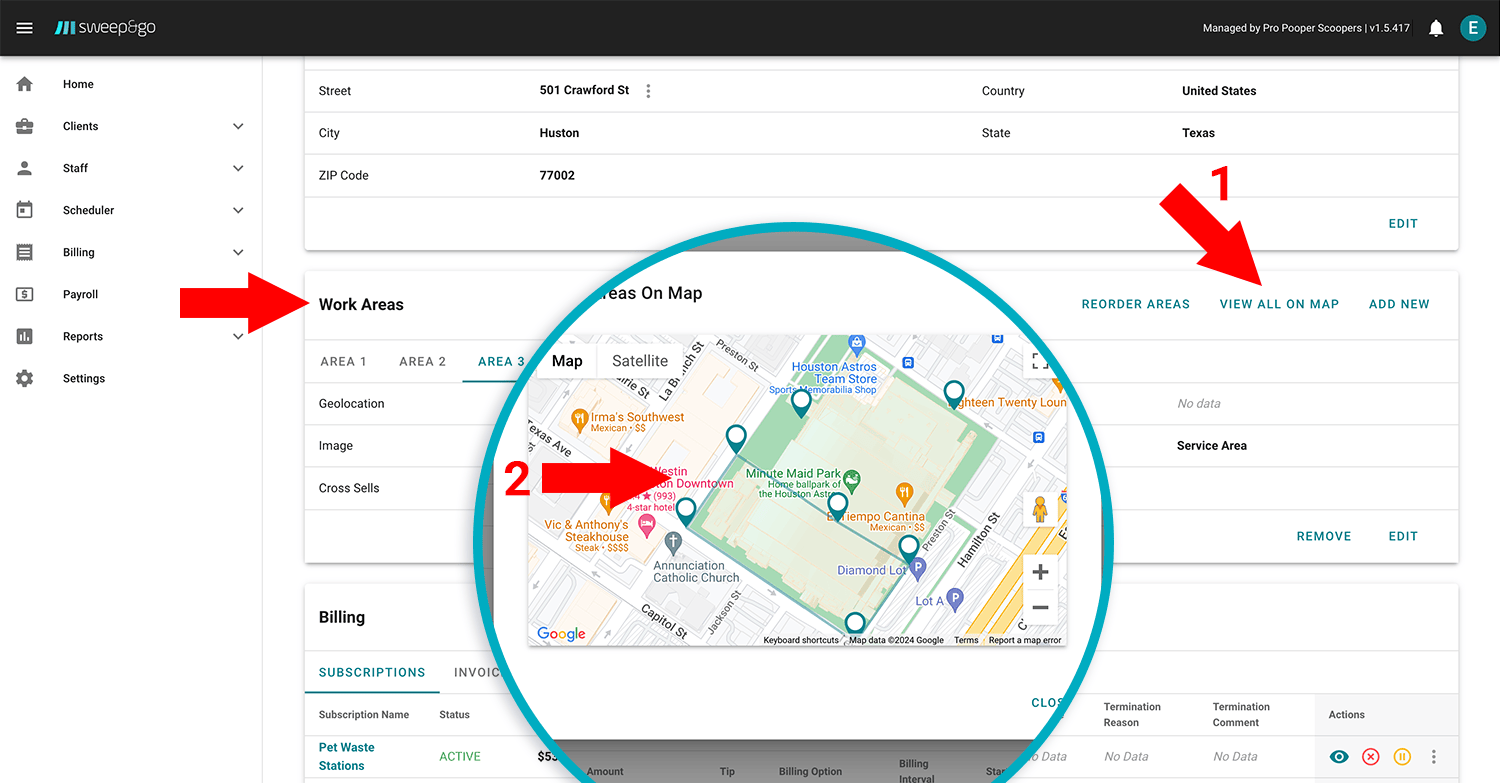
View all work areas on the map
If needed you may reorder work areas.
Billing
Under the billing section you may make changes to the client subscription, invoices, payments and payment methods. To view subscription details click on the subscription name or view icon next to the subscription. To cancel the client subscription click on the X icon next to the view button. You will be asked to enter the end date and termination reason. To pause the service click on the pause icon. You will be asked to enter a pause time frame. Changes to the subscription can also be made under subscription details > Actions.
If you would like to create a new subscription click on Create new subscription. If you choose a future date for subscription start date the subscription will have status pending until the start date and then it will become active. While it is in pending status it cannot be modified. If you would like to make the subscription ACTIVE, you may cancel the current PENDING subscription and create another one starting on the present day or in the past.
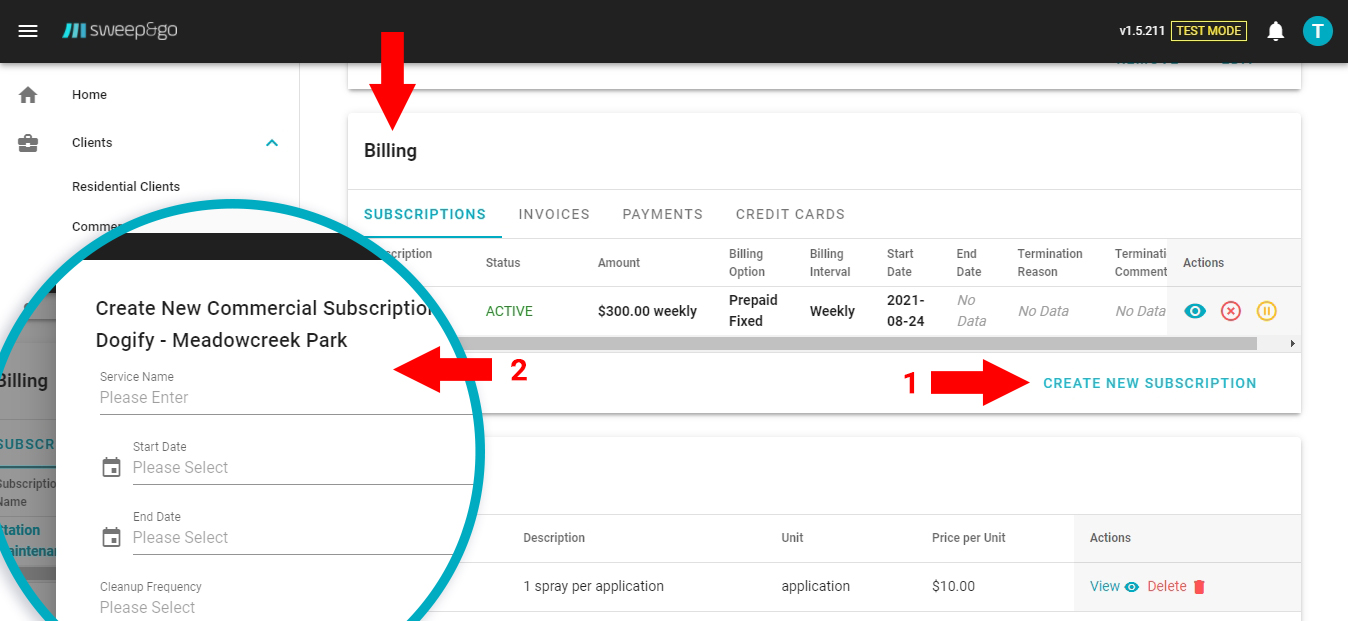
Create new client subscription
Under the Invoices tab you may view and update client invoices. Invoice drafts are auto created based on your billing settings. To view invoice details click on invoice number or view button under actions. To make changes to invoice draft click on More > Edit. If you want to save changes but send an invoice later you may click on save draft. If you want to finalize an invoice without editing click on More > Finalize Invoice. Email with a pdf invoice will be sent to the client. After you finalize an invoice, under More actions you may receive a check payment, void it if necessary, download or resend by email. Please note that finalized invoices cannot be edited. To make any changes to an invoice, void the invoice and create a new one. To learn more about invoicing, please go to Invoice Clients tutorial.
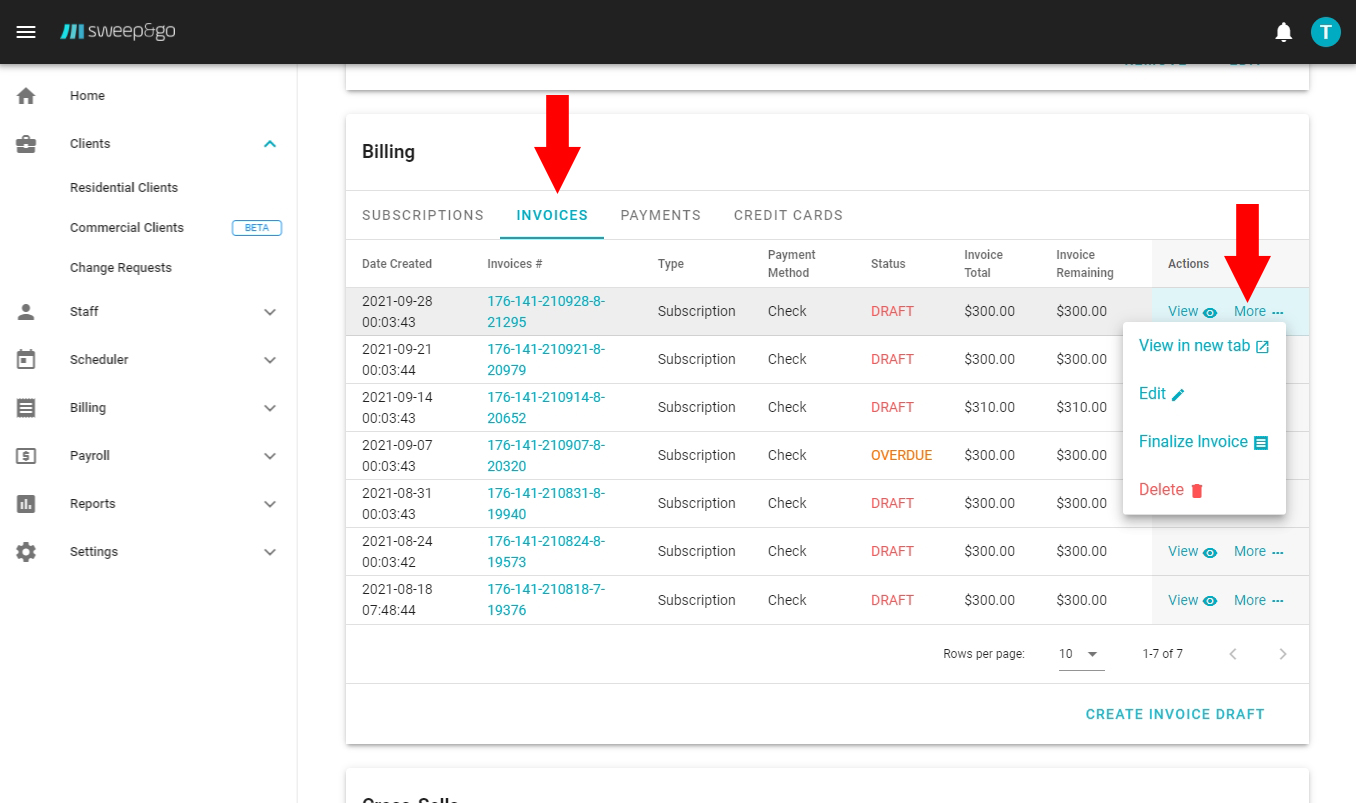
View client invoices
Under Payments tab you may review client payments or receive a new check payment. Payments may be refunded or deleted. If for any reason a received payment was not applied to the correct invoice you may edit the payment. To edit payment click on view payment > Edit > Select correct invoice > Save. To receive a new check payment click on Receive check payment button.
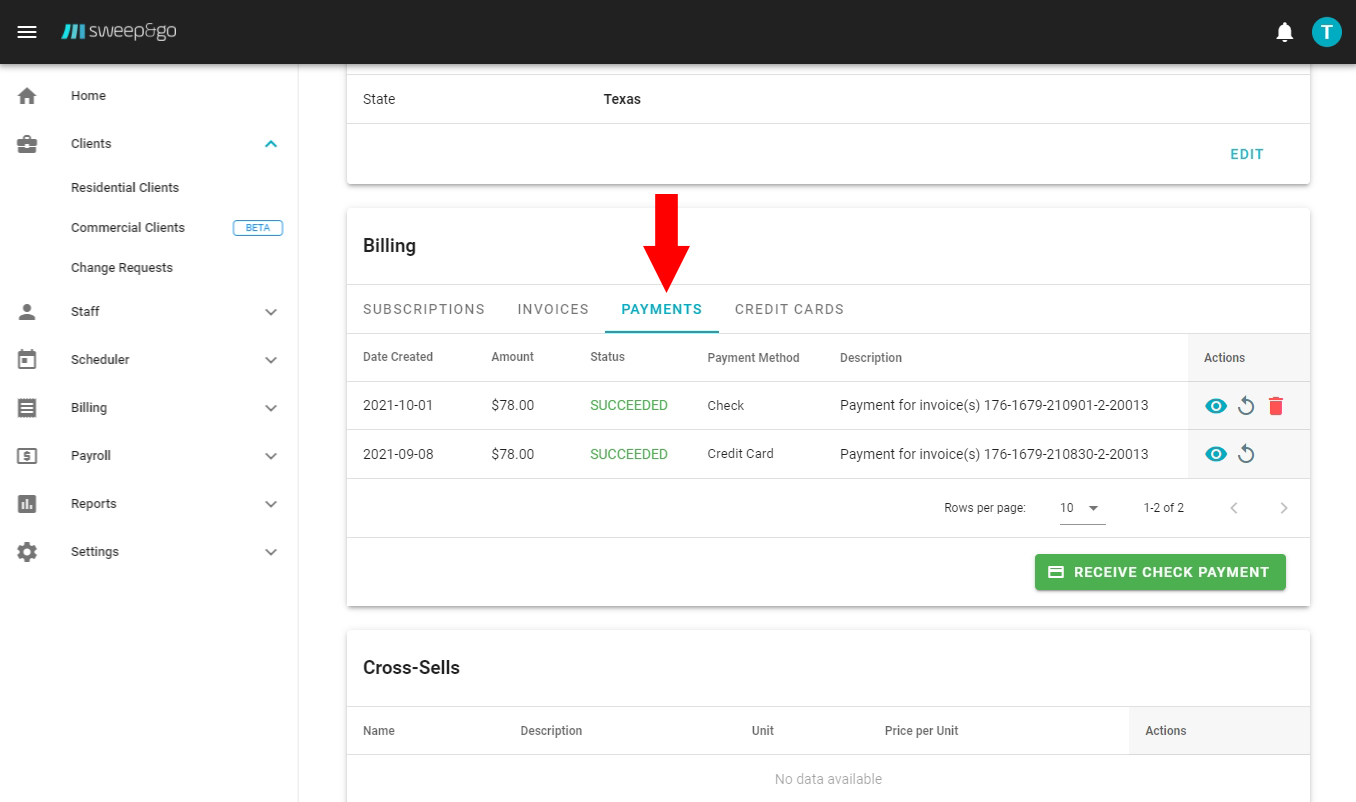
Review or receive payment
Under the Credit Cards tab you may view, add or remove client credit cards. To add a client credit card, click on add card. Please note that if the client has any open balance when you add a credit card the app will automatically charge the open balance at midnight.
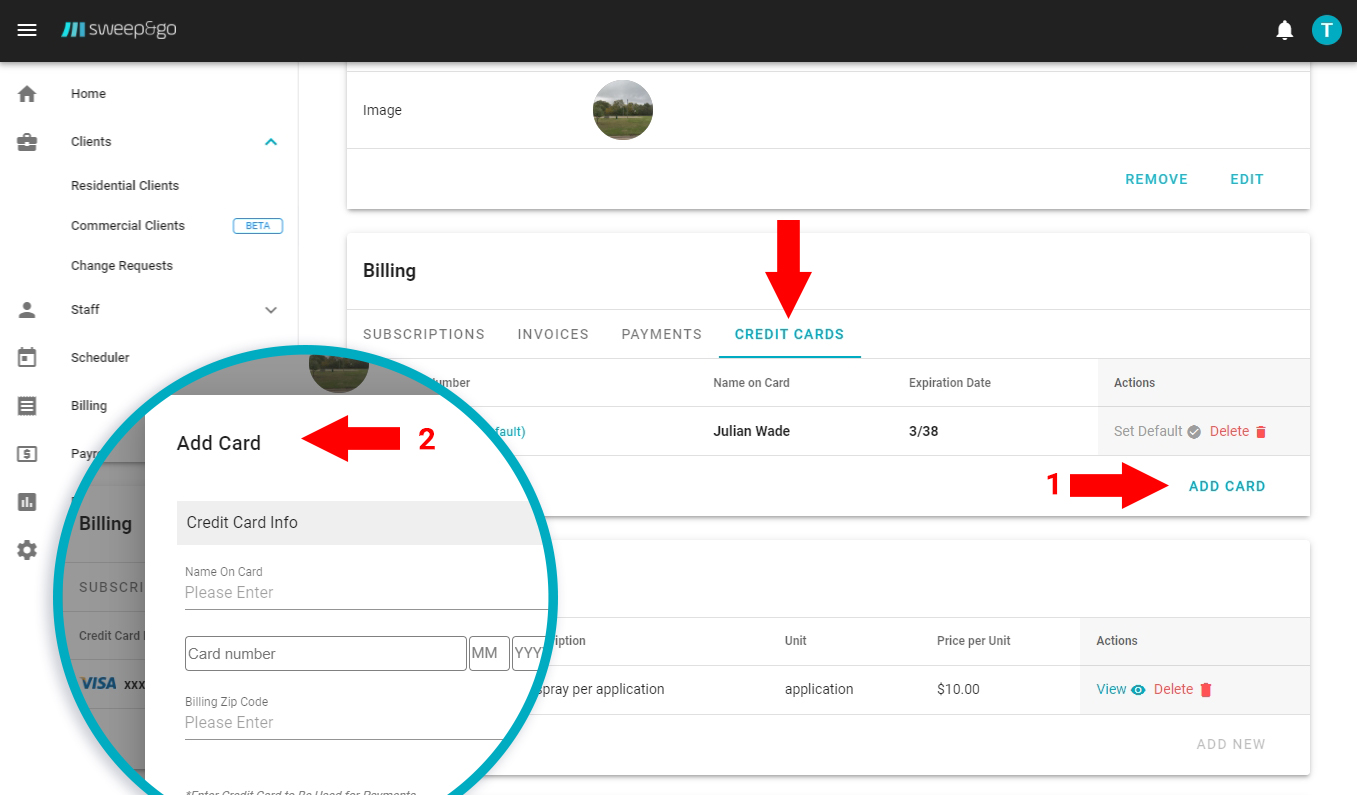
Add or remove credit card
Cross-Sells
If you offer additional services or products such as bag rolls you may add those items within this section. To assign cross-sells click on Add new button > select the service > Save. You may choose whether cross-sell is billable and it should be added to invoices or it is already included in subscription price but you want to use it for stats only. To create cross-sells go to Settings > Commercial Cross-Sells > Add new.
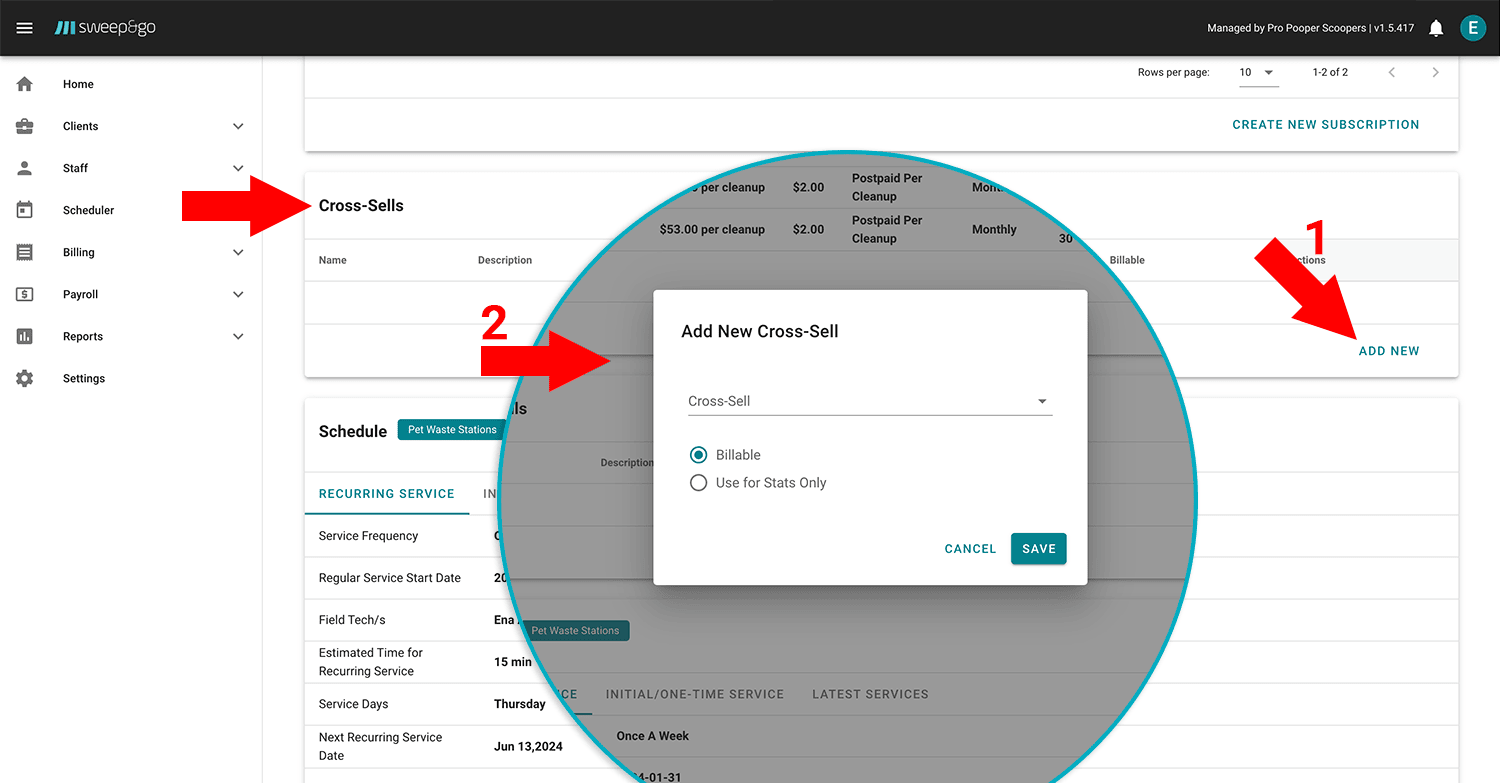
Assign additional service or product
Schedule
Within the schedule section you may review the latest services, initial, one time and recurring services info such as service frequency, service days or assigned tech/s. To modify service days or reassign the tech click on Edit under Recurring Service tab > update service days and tech/s > Save. It is possible to assign multiple techs to a single commercial job. If you don’t see any schedule details, make sure to assign your client location first.
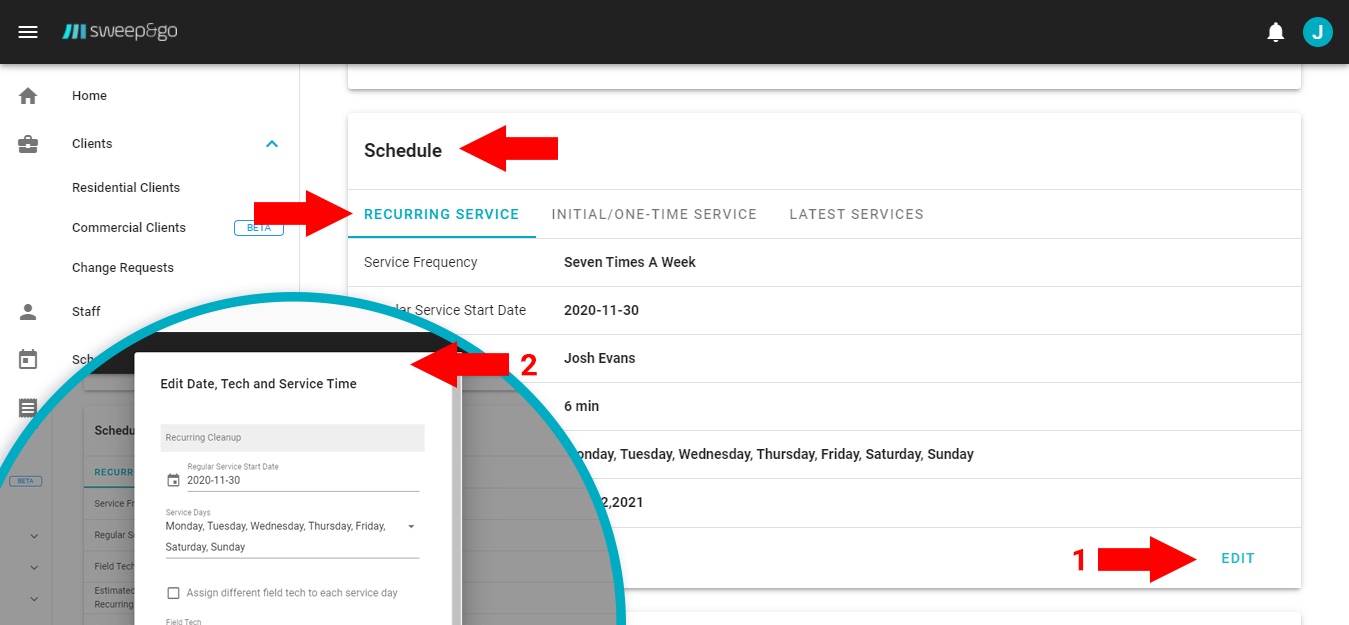
Review or modify client schedule
Notes
Within the Notes section you may write, edit or delete office notes, notes to tech or review notes from the tech. You may set start and end dates for notes to field techs. To write a note click on Create Note.
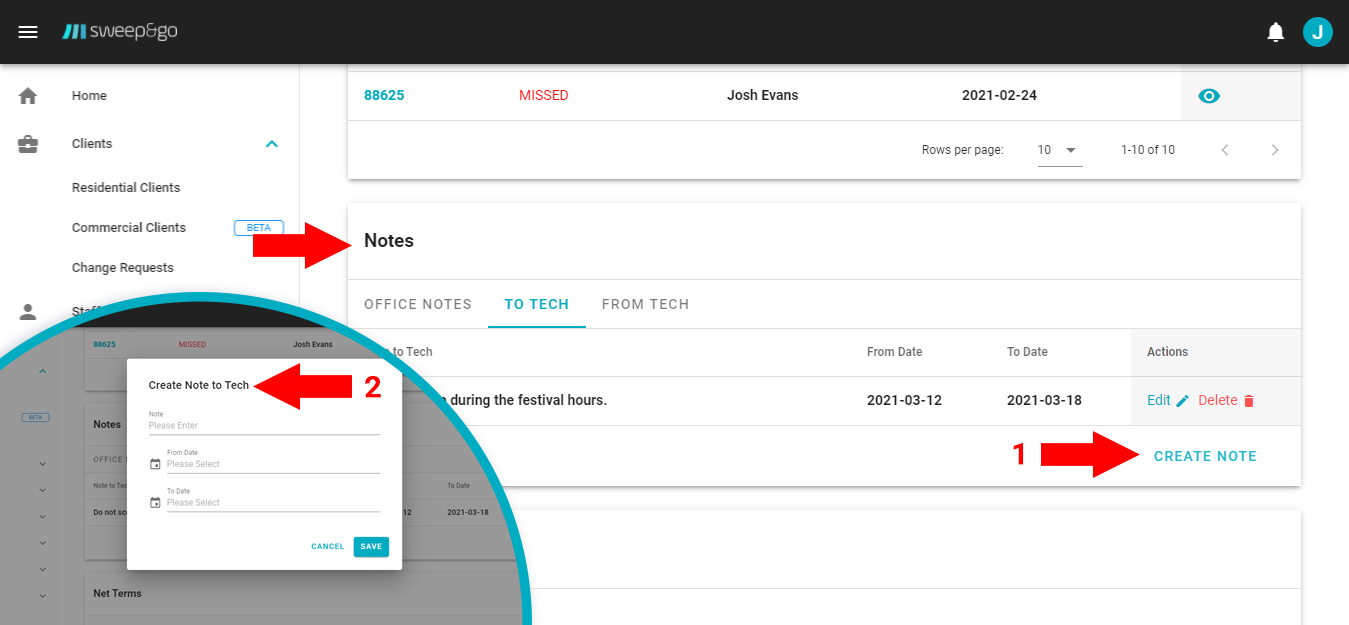
Create notes
Net Terms
You may allow your clients extra time to pay for their invoices. It is possible to set net terms within your billing settings or per commercial client. If you choose NET10, clients will be charged 10 days after their invoice is finalized.
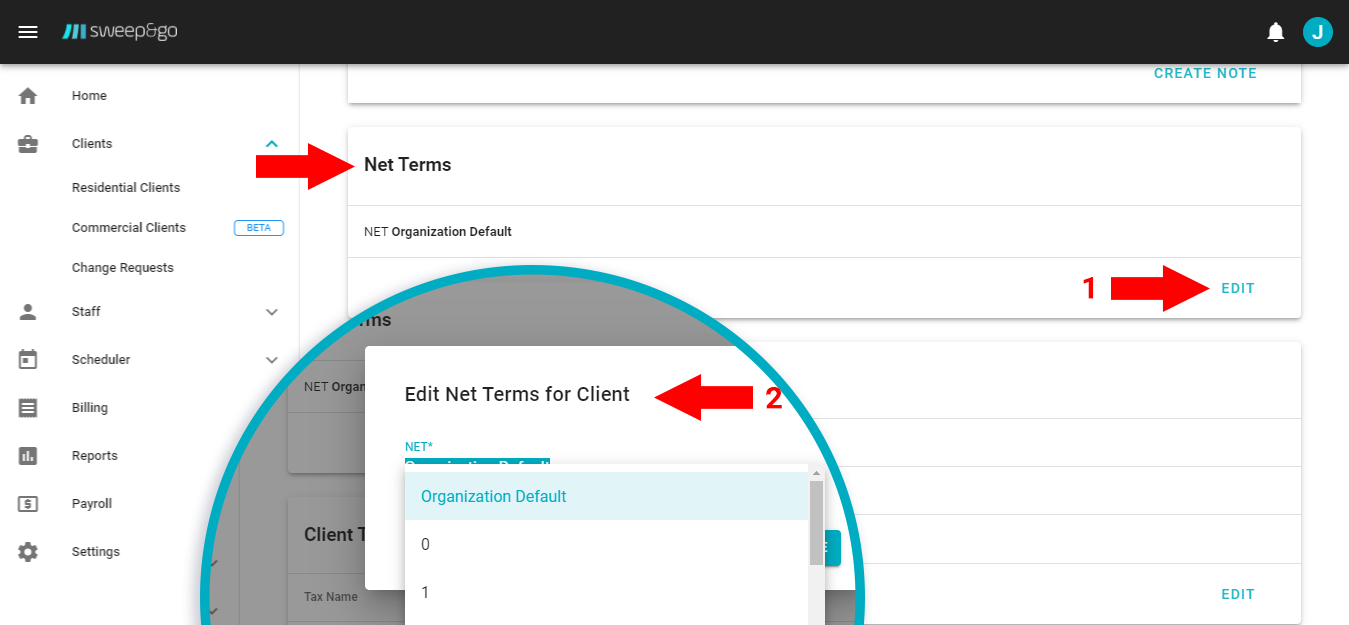
Set client net terms
Client Tax
If you are required to charge a sales tax you may set it as default tax on the account level or create different sales tax zones and edit tax per location. You may set different sales tax for products and services.
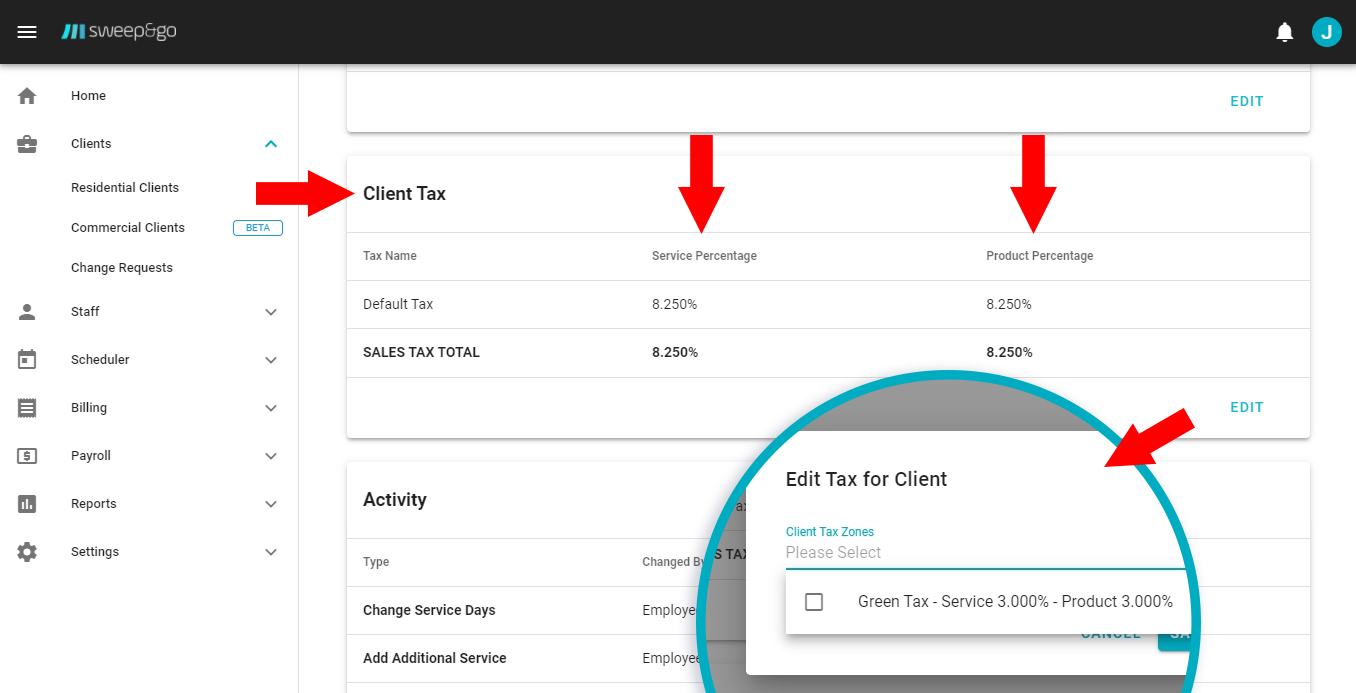
Set sales tax rate
Activity
The activity section chronologically lists changes made to the commercial account.
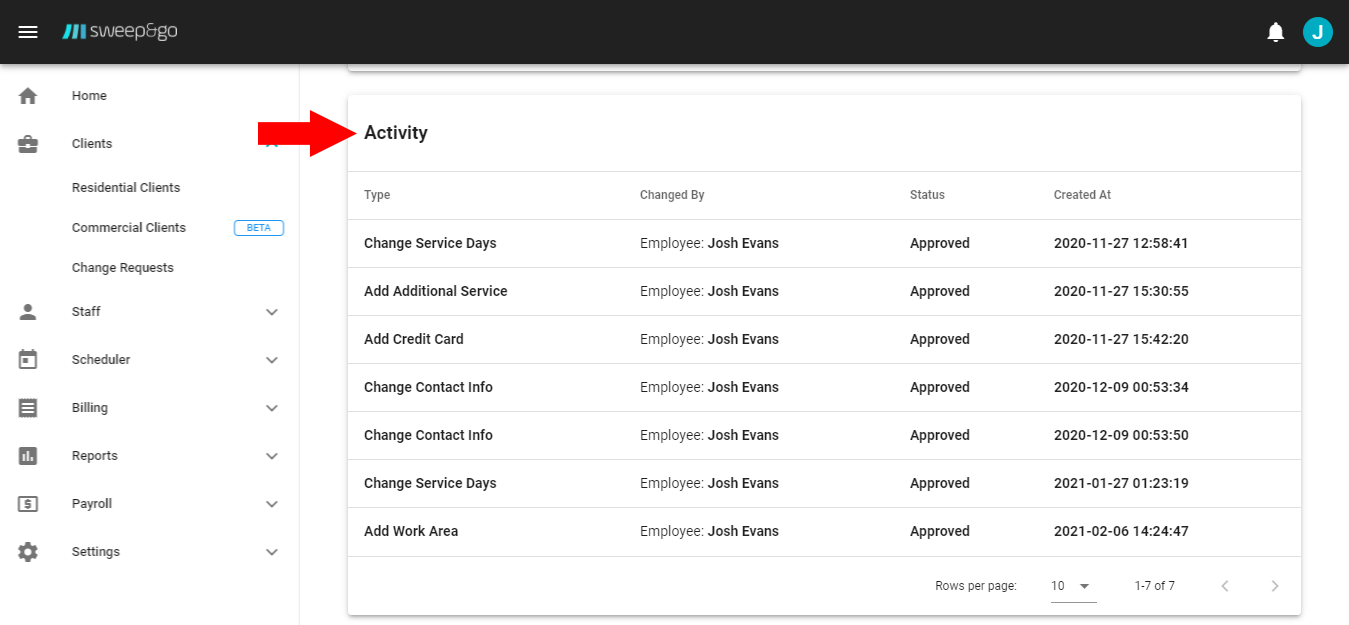
Review activity on client account
Additional Differences Between Commercial and Residential Accounts
At this moment commercial clients cannot self-onboard. We recommend you to create a simple interest form for commercial clients on your website.