

Overview
A ticketing system is a centralized area within the app where customer or employee requests can be organized and support tasks can be streamlined. It converts inquiries from multiple channels into trackable tickets, allowing teams to prioritize, assign, and resolve issues efficiently without overlooking important messages.
In this tutorial, you’ll learn how to:
- Configure your ticketing settings
- Create tickets in the Employee Portal
- Handle tickets across Sweep&Go Accounts
- Create tickets in the Client Portal
- Create tickets in the Fieldtech Portal
Ticketing Settings
In Settings, you can manage your ticketing preferences. You can enable ticketing in the Client Portal, create custom ticket statuses, types, and priority levels, and configure your ticket forms.
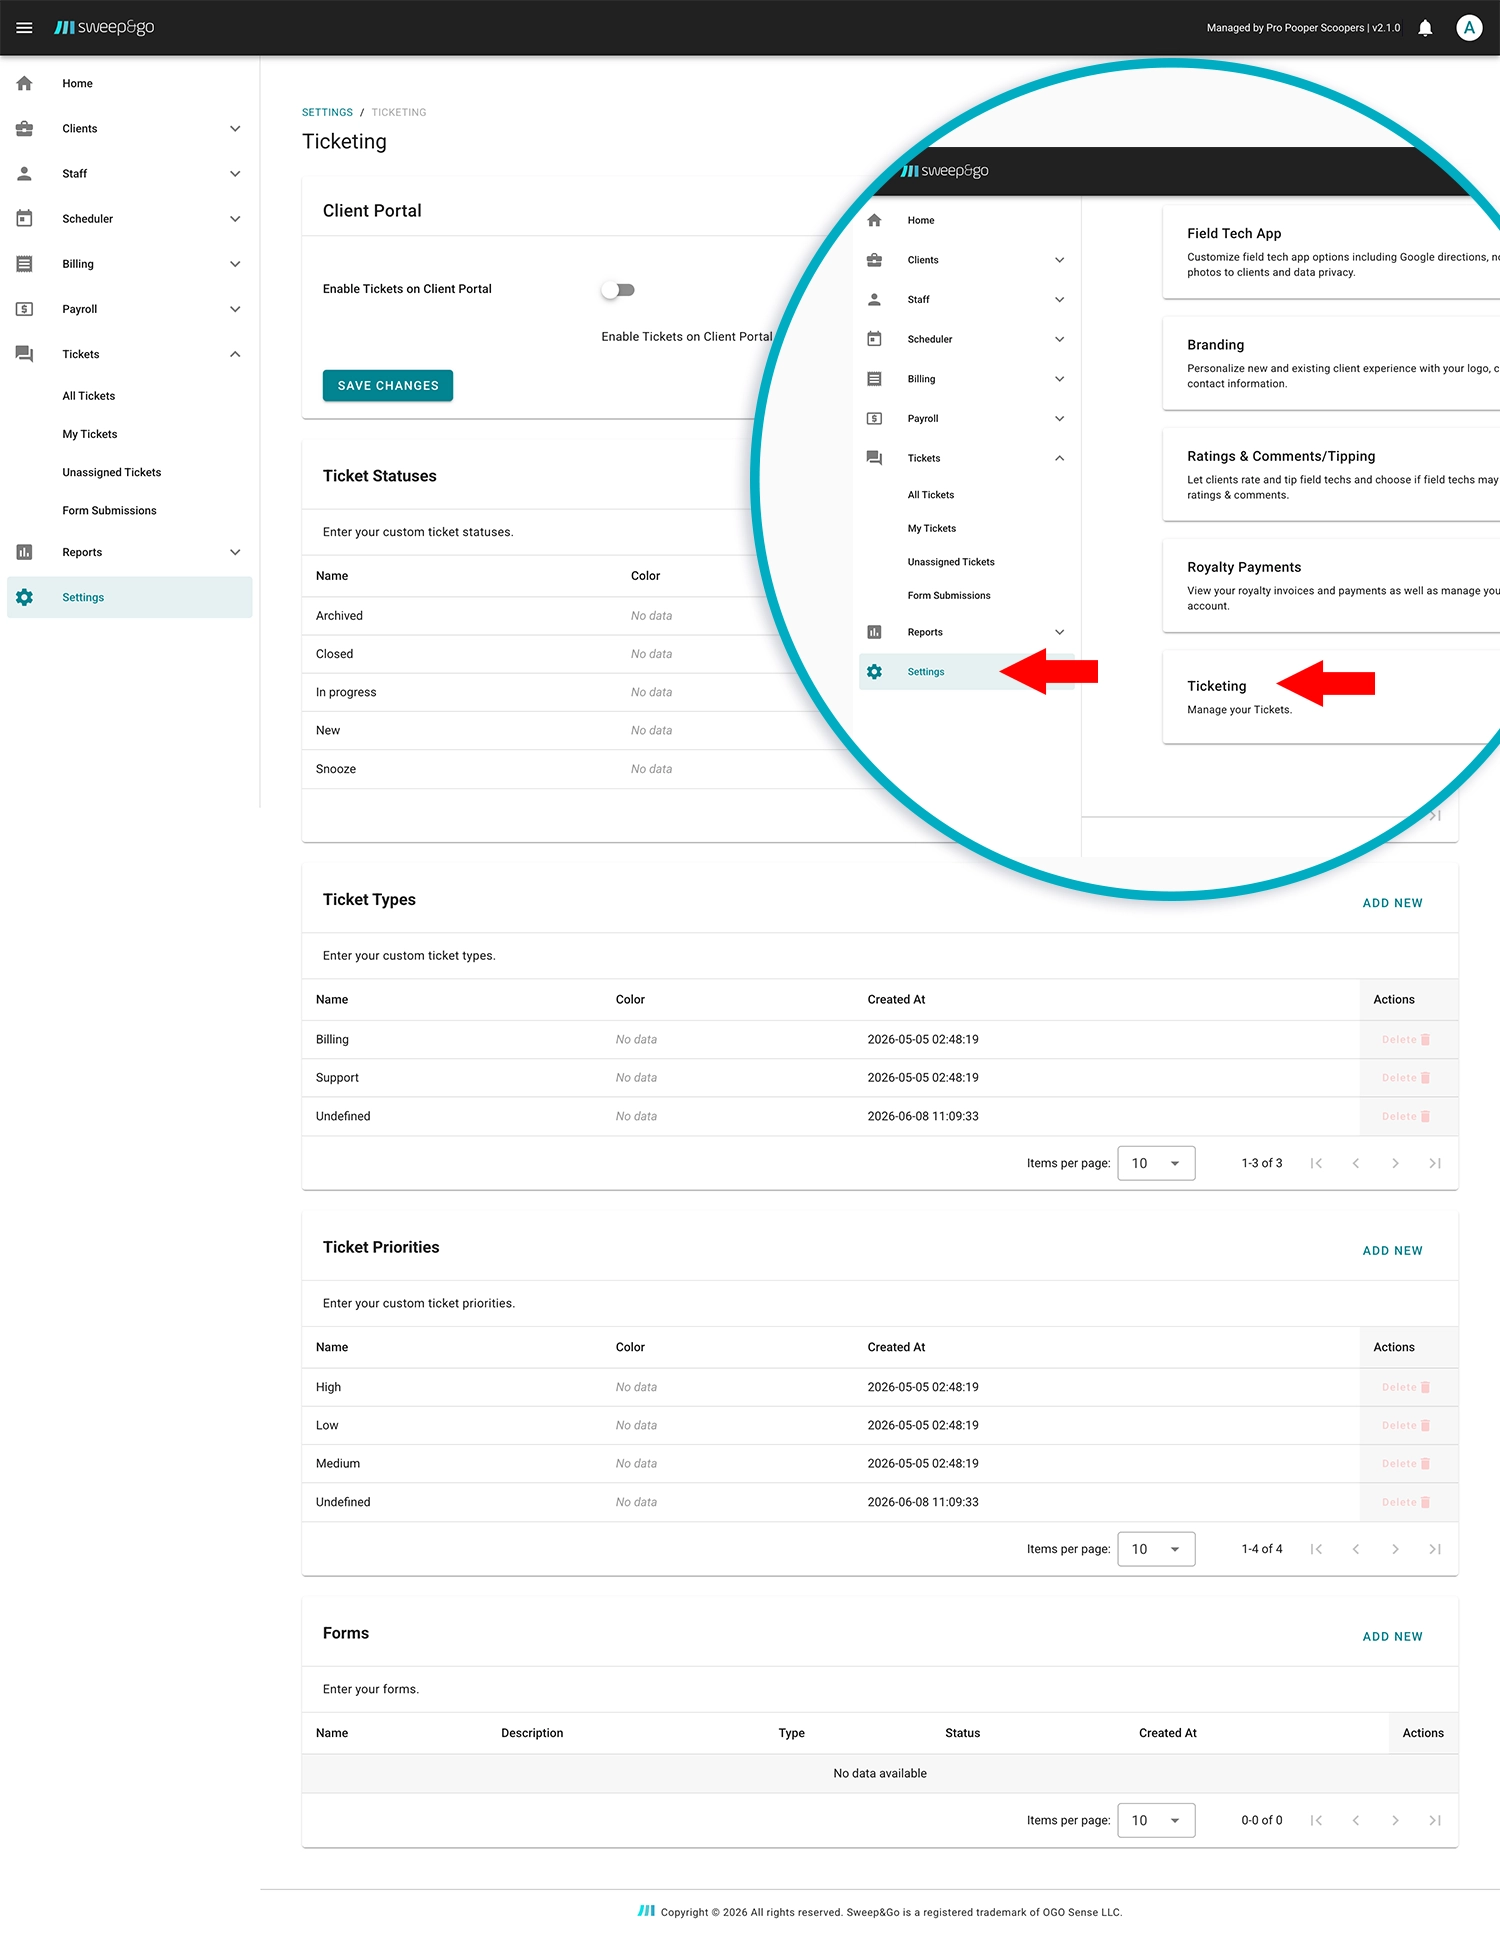
Manage your tickets and forms
To create a new ticket status, type, or priority, click Add New. Enter a name and select a color for the new option. A status, type, or priority that is currently in use cannot be deleted from Settings.
To create a new form, click Add New and complete the required fields. Forms can be used for both one-time and recurring tickets, such as scheduling a technical vehicle inspection.
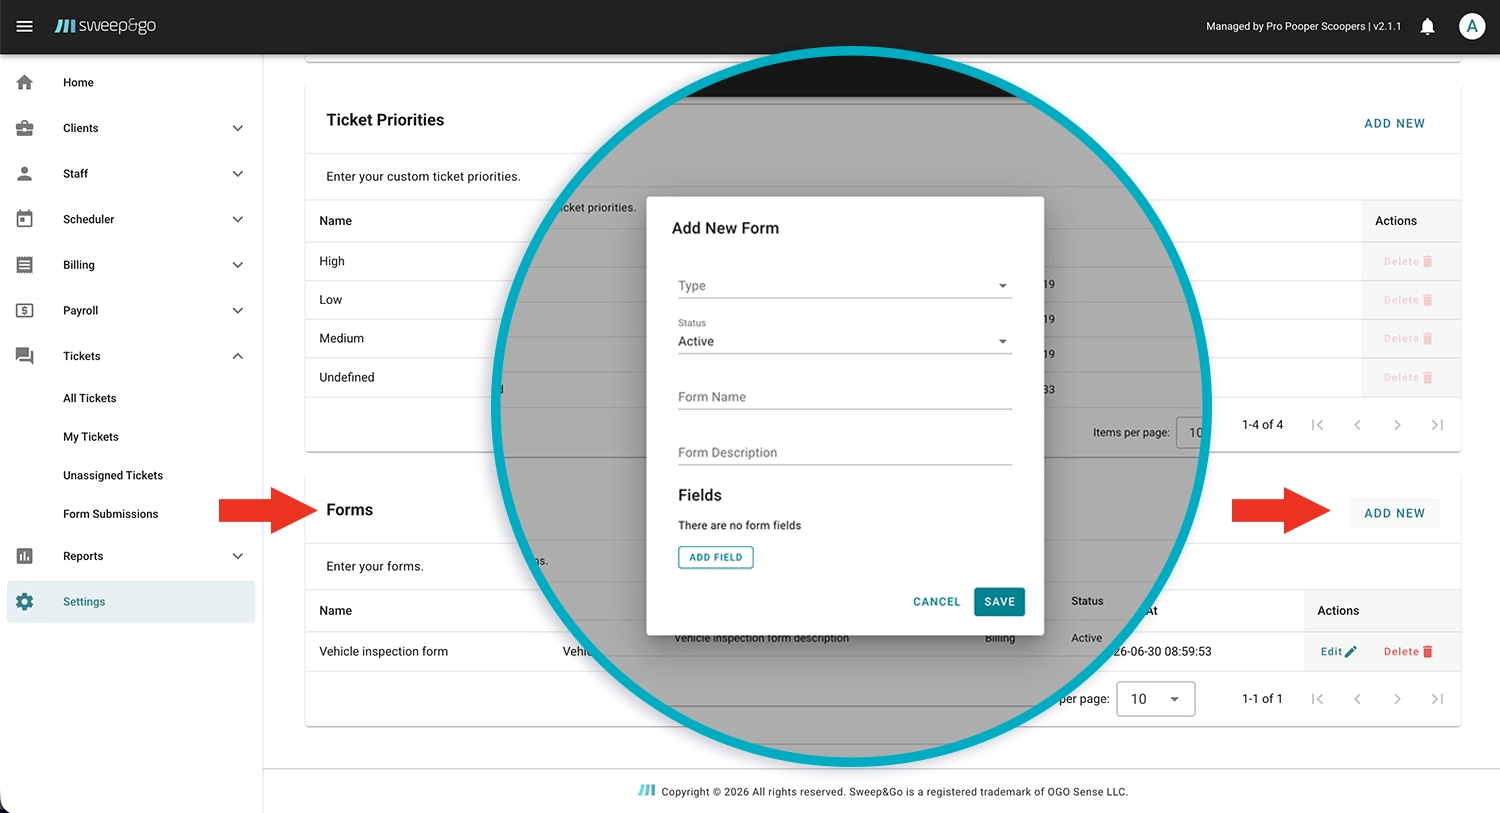
Create your custom form
Create tickets in the Employee Portal
To create a ticket, go to Tickets > All Tickets > Create New. From there, you can select the client, ticket type, and status, assign a staff member, and set a due date.
You can also choose whether the ticket should be visible to the client in the Client Portal and whether it should be created as a recurring ticket.
Sticky Ticket: Select the Sticky Ticket checkbox to keep the ticket pinned at the top of the jobs list in the FieldTech app, making it easy for technicians to find and access.
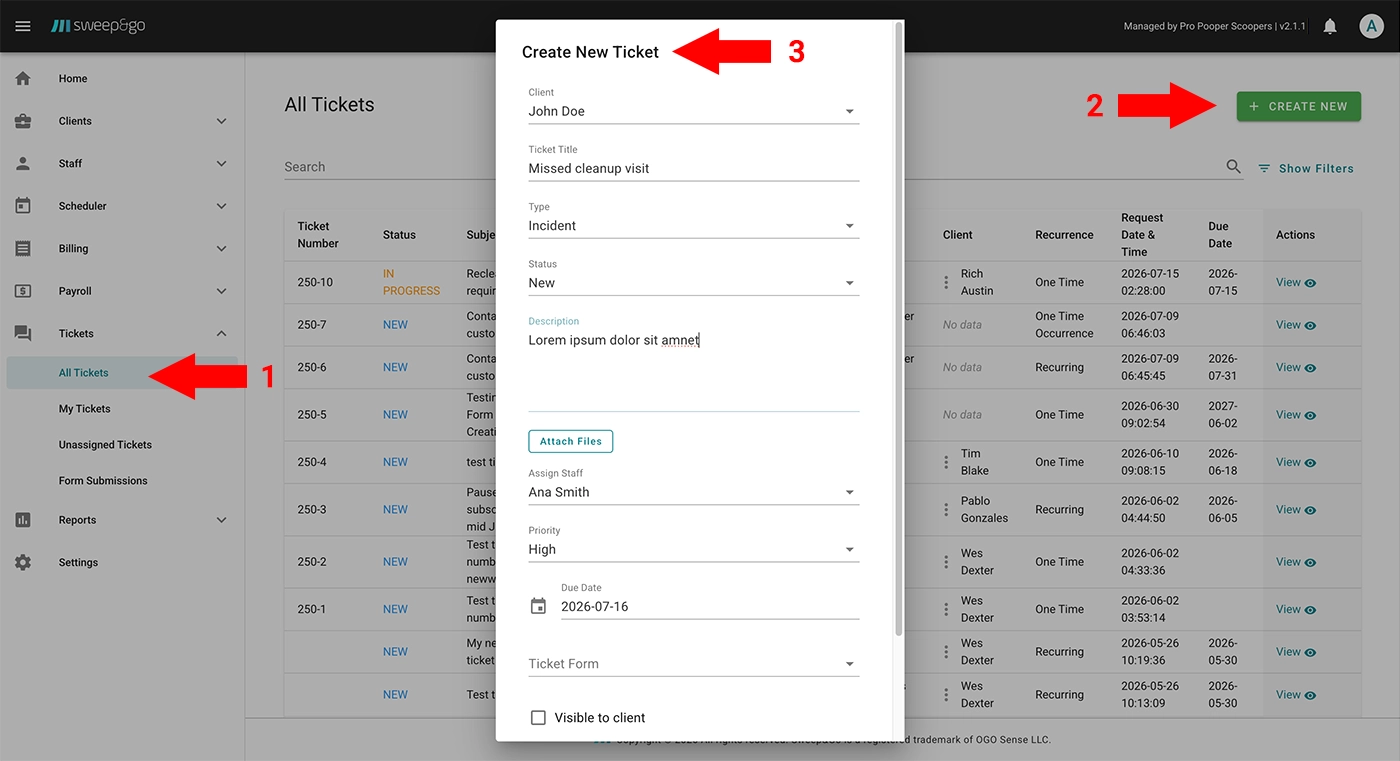
Create a ticket
For recurring tickets, you must configure the frequency, interval, days, end type, and start time.
The frequency determines how often the ticket repeats, such as weekly. The interval specifies the number of frequency periods between repetitions. For example, if you select a weekly frequency with an interval of 2, the ticket will repeat every two weeks.
Under Days, select the day or days of the week when the ticket should repeat.
Under End Type, choose whether the recurrence should:
- Never end
- End on a selected date
- End after a specified number of occurrences
The Start Time determines the exact time when the recurring ticket will be created.
When resolving a ticket that includes a required form, open the ticket and click Submit Form. Complete all required fields, then click Submit. The completed form will appear in the Form Submissions section.
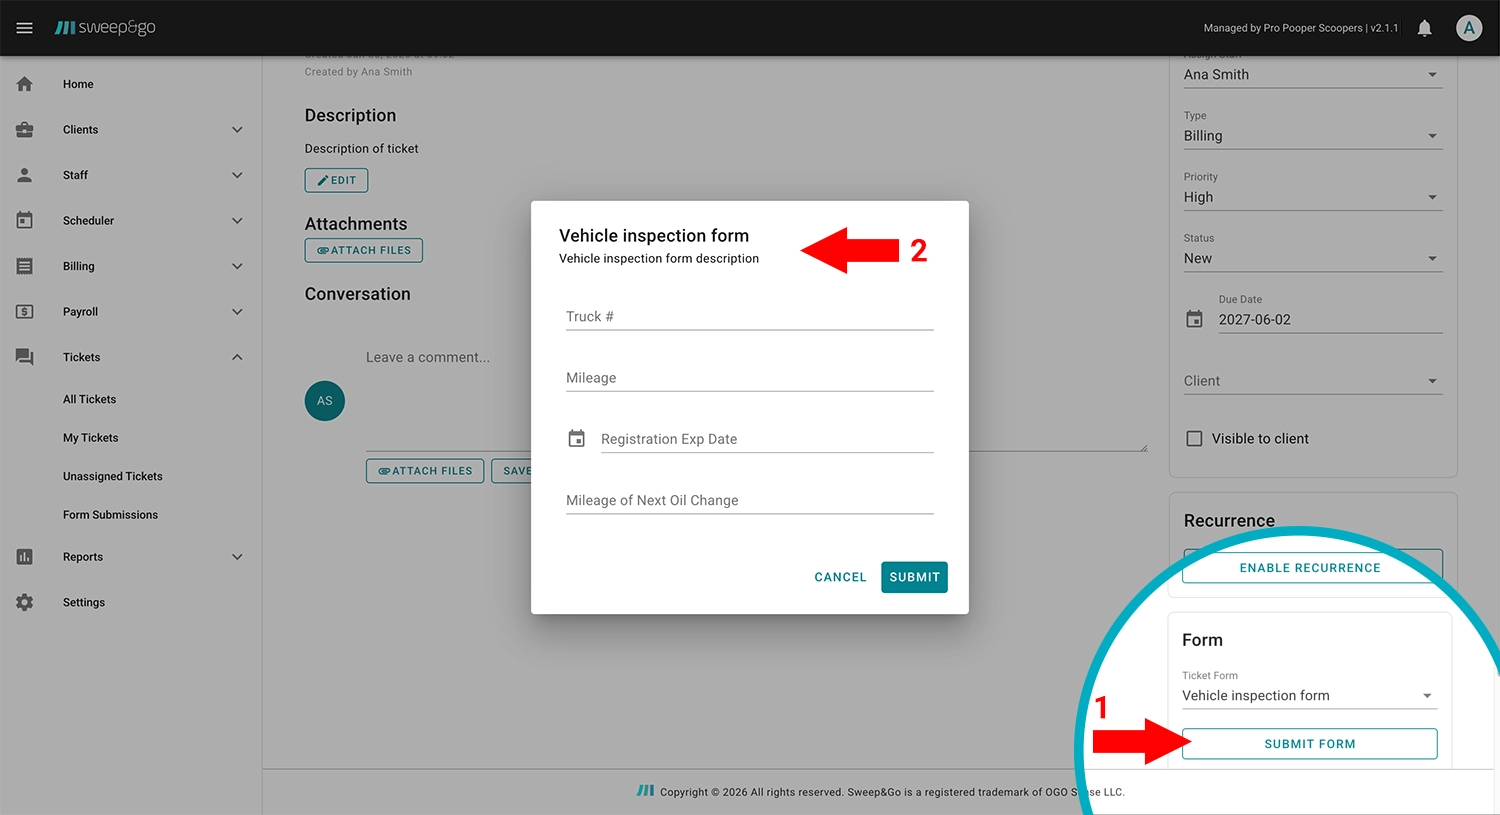
Submit the form
Under All Tickets list you will see all created tickets which you can filter by due date, status, assigned to or by client name. Under My Tickets you may see your own tickets and under Unassigned Tickets all the tickets which haven’t been assigned to a staff member yet.
Handle tickets across multiple Sweep&Go Accounts
To create tickets for multiple locations, you must first add a support staff member in the Multi-Account Portal. When creating the support staff profile, select the locations for which that staff member will be allowed to create tickets.
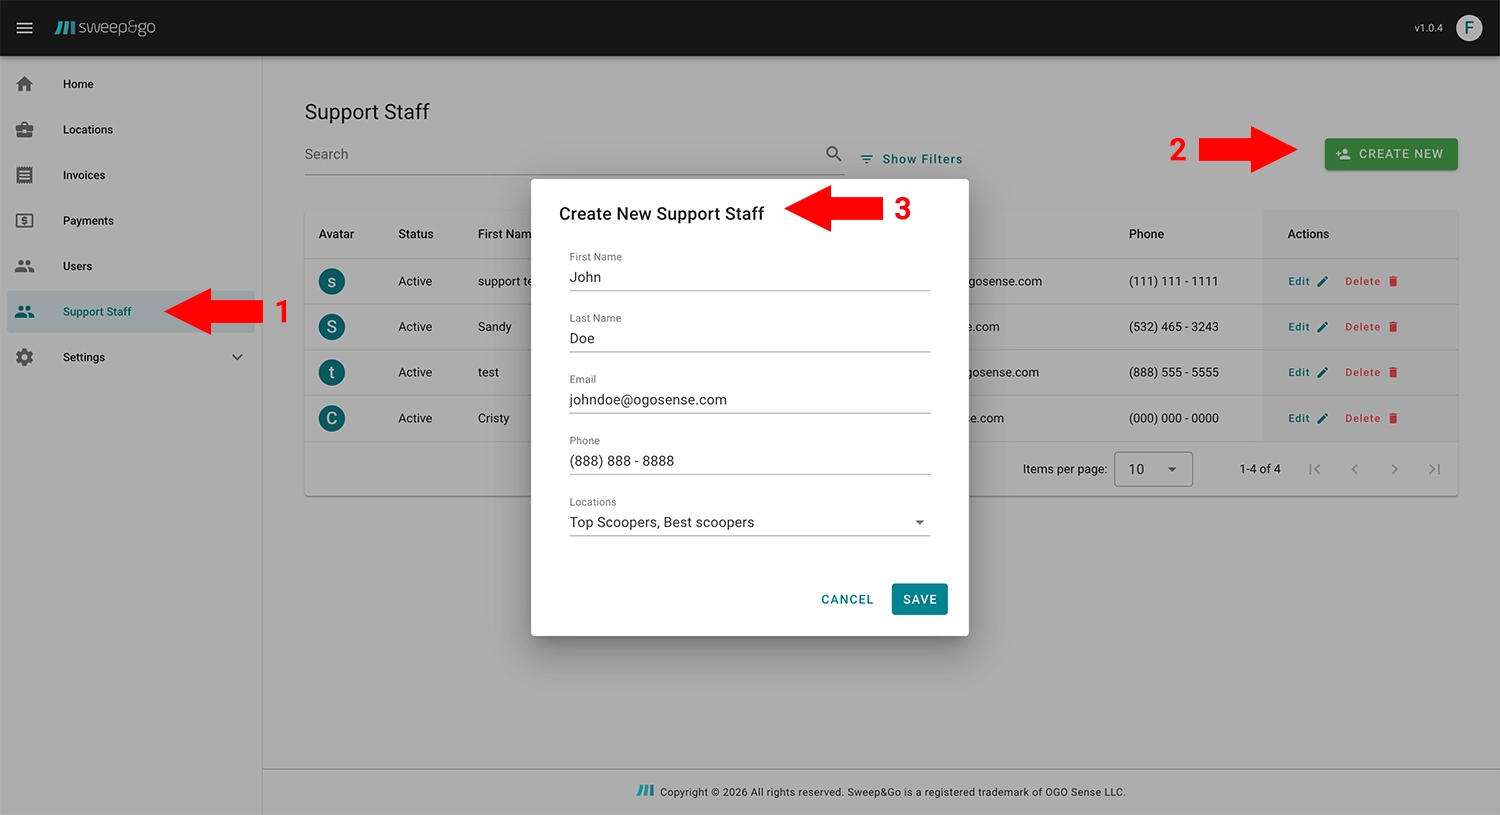
Add support staff
After you create the user, they will receive their Employee Portal login details by email.
Once logged in, they can open the Support menu to view residential and commercial clients from all assigned locations. Under Tickets, they can view all tickets and form submissions.
Note: When you create a support staff make sure to use an email address which does not exist in the employee portal. If the same email address exists in the employee portal user would be logged in as staff. The employee role is a priority over the support role.
You don’t need to use a completely new email address, you can create an email alias. In this case, make sure to use a different browser or incognito tab for support staff role.
Once logged in, they can open the Support menu to view residential and commercial clients from all assigned locations. Under Tickets, they can view all tickets and form submissions.
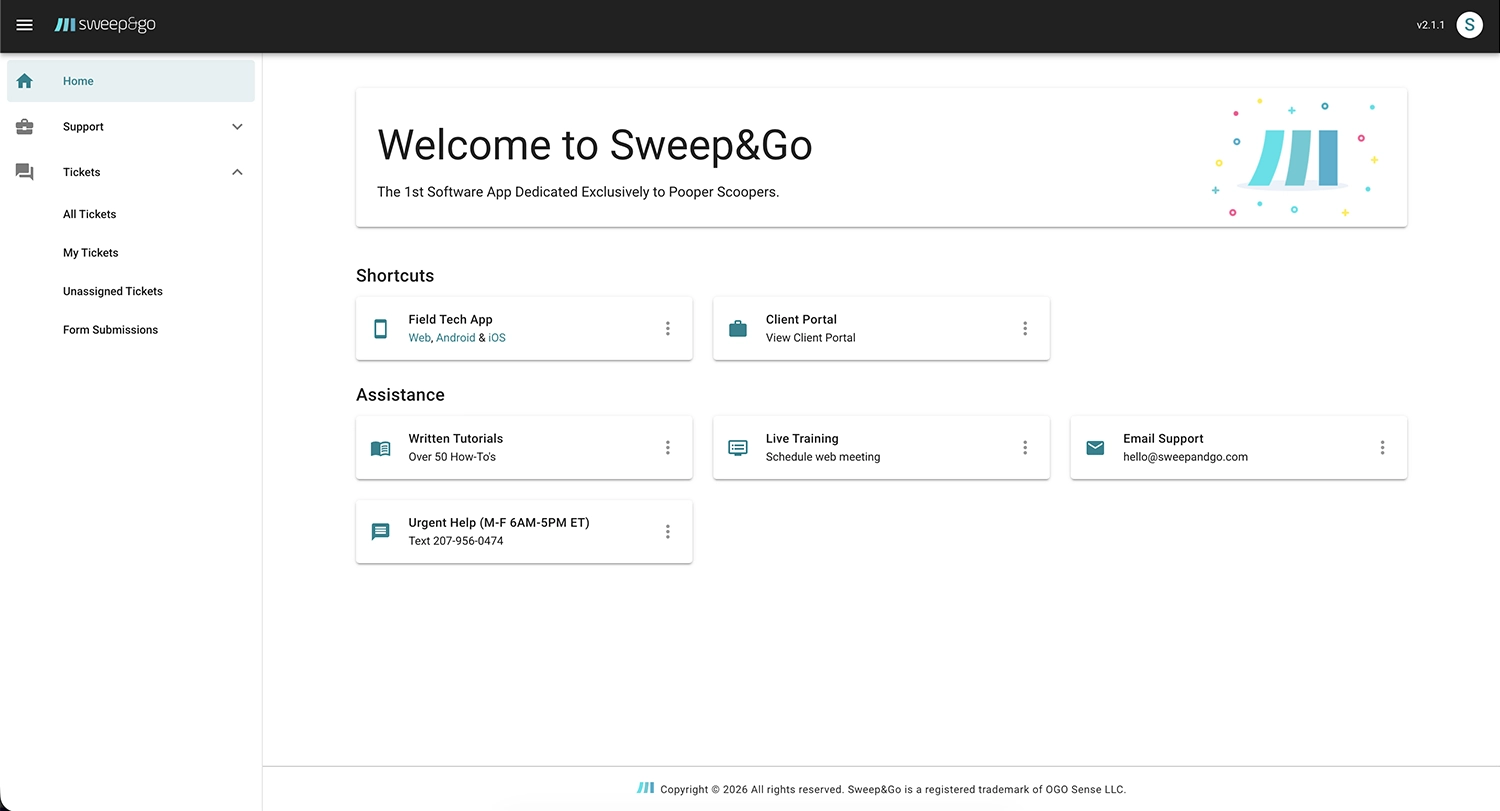
Log into the employee portal
When creating a new ticket, you must first select the location associated with the ticket. After selecting a location, you will be able to view and choose from all clients assigned to that location.
Create tickets in the Client Portal
To allow customers to create tickets in the Client Portal, first enable this option in your ticketing settings. To create a ticket, customers can go to My Tickets and click Create New.
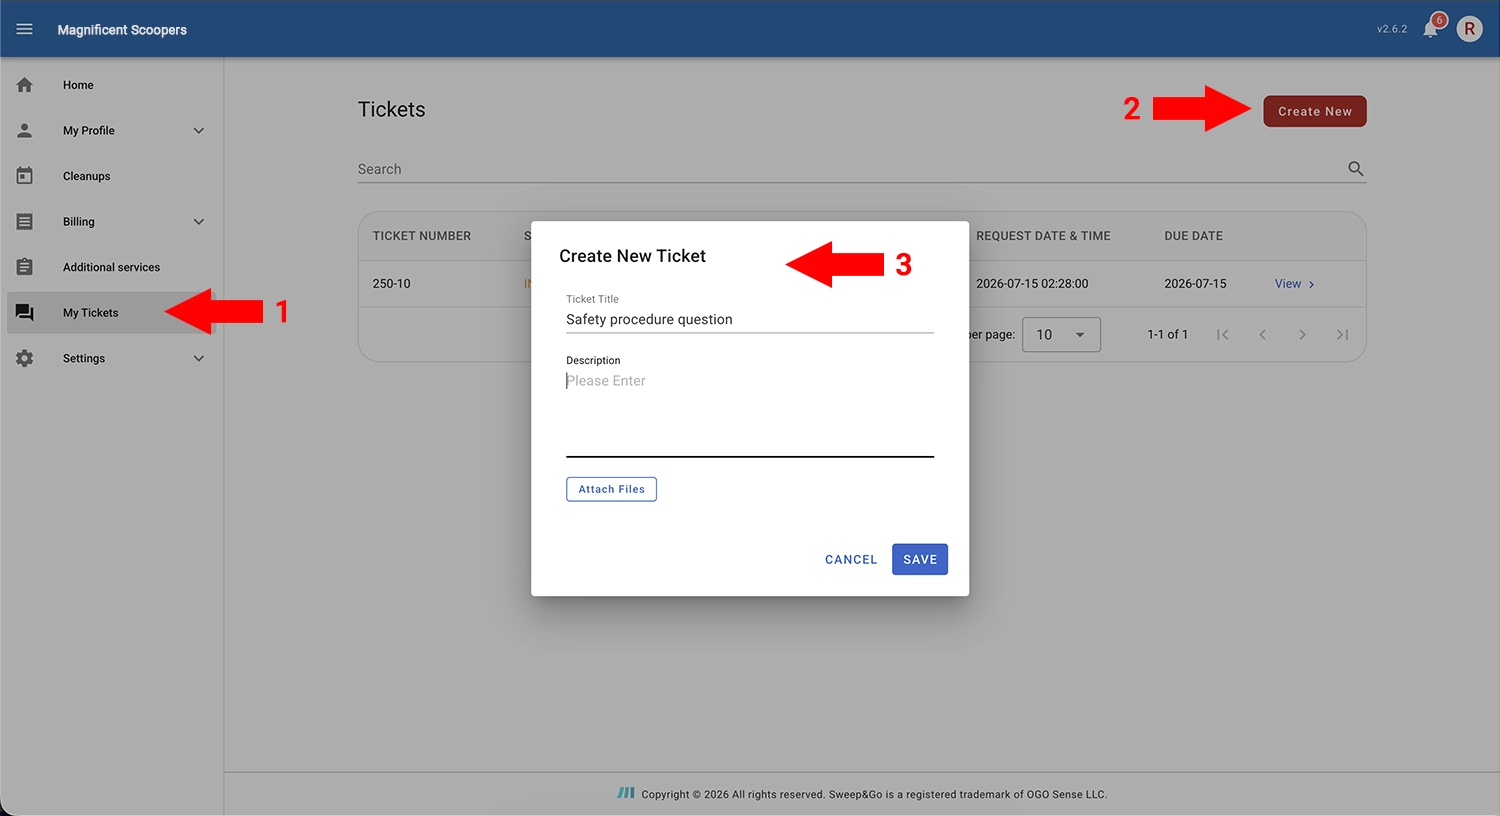
Create a new ticket
Created tickets will appear in the Employee Portal under the All Tickets and Unassigned Tickets sections.
From the ticket details page, you can assign a staff member, select the ticket type and priority, set a due date, make the ticket recurring, or leave a comment for the client.
When assigning a staff member, be sure to save your changes before continuing with the ticket assignment process.
All updates made in the Employee Portal will also be visible in the Client Portal.
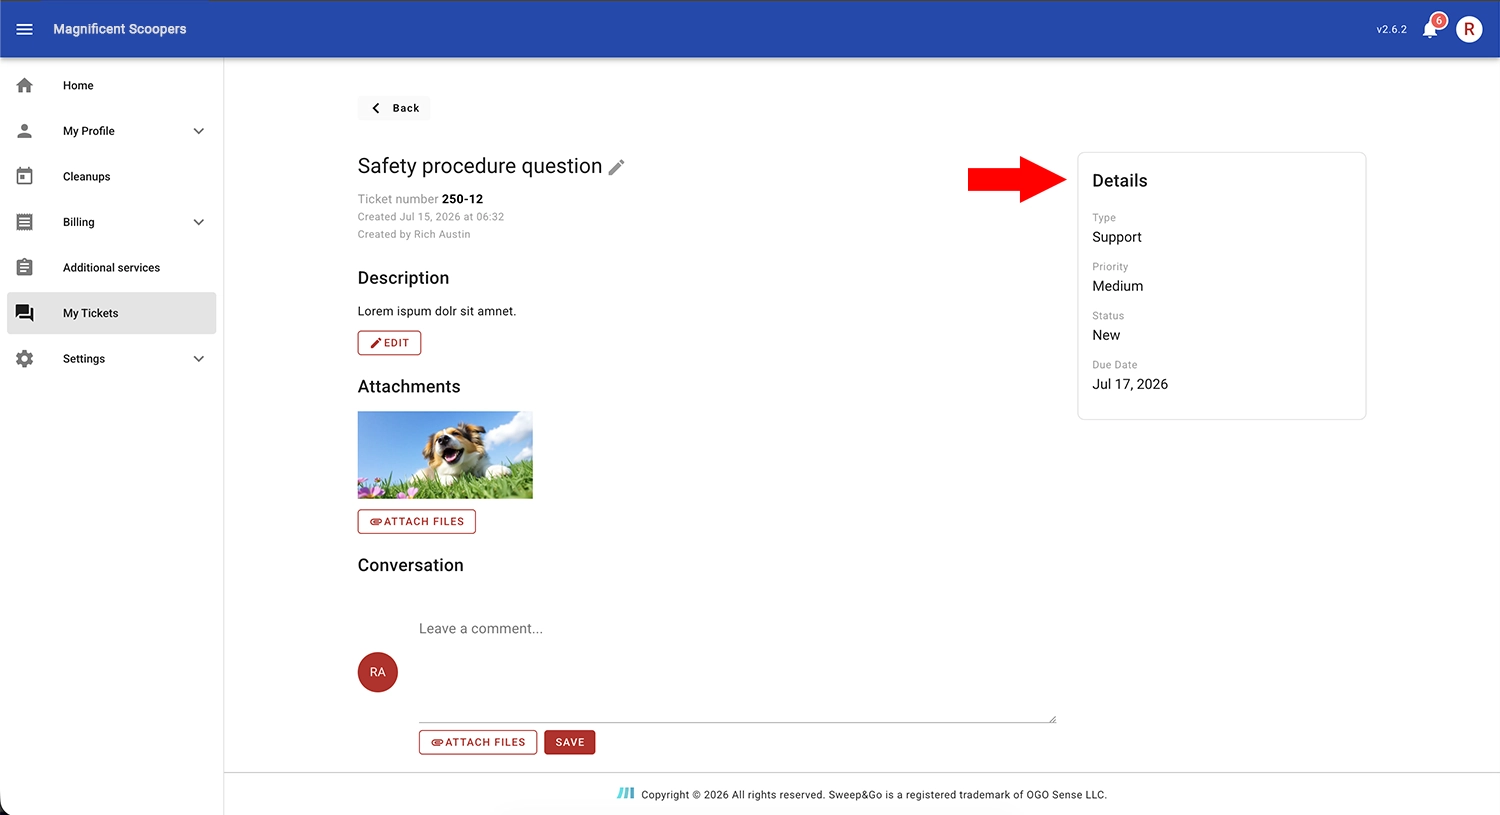
Check ticket details
Create tickets in the Fieldtech Portal
In the fieldtech app you can see your tickets and create tickets for other staff members.
Sticky tickets are pinned at the top of the jobs list, making it easy for you to find and access it. When you click on it you will see ticket details. After you mark a ticket as closed, it will disappear from the jobs list.
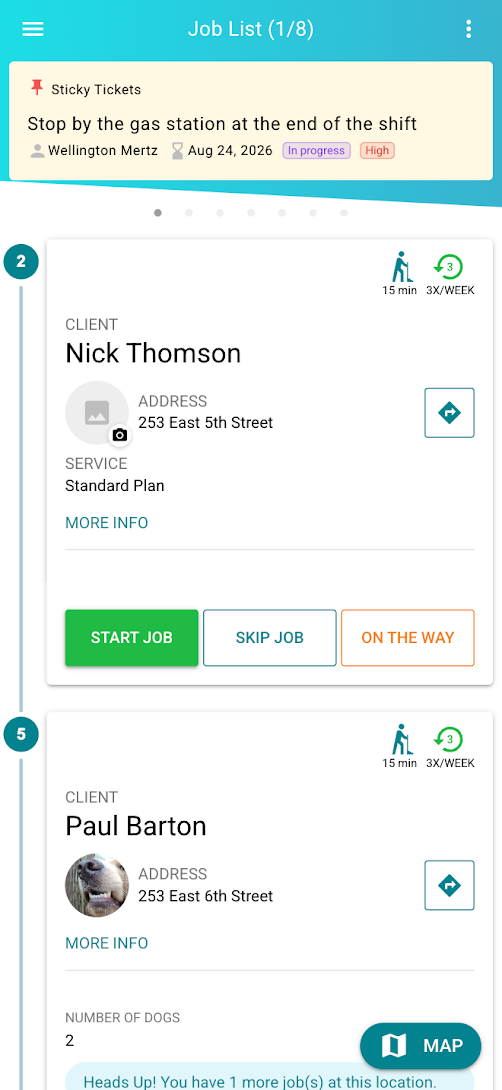
Check your sticky tickets
To create a ticket go to My Tickets under Menu and click on + (plus) sign.
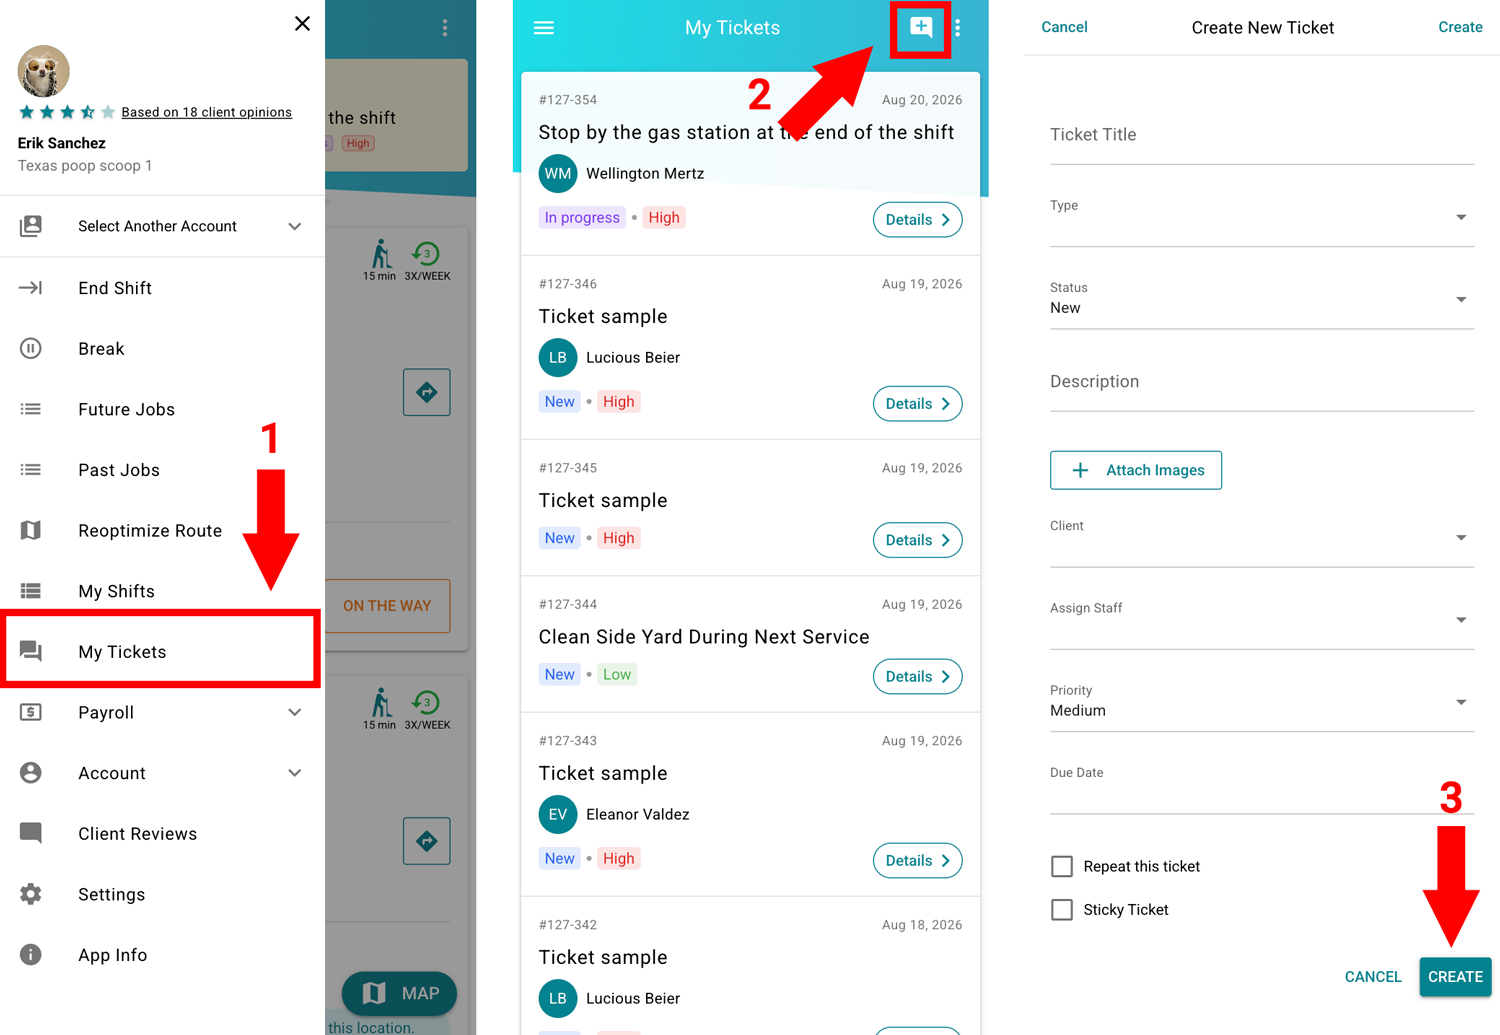
Create a ticket
To sort or filter tickets click on three dots and choose Sorting or Filters.
PLEASE NOTE: The Support Staff created through the multi-account portal is included in usage records but is provided free of charge.
